Showing posts with label fun with challenges. Show all posts

13 August 2015

Cirrus Solids Miniquilt Challenge--Finished!

Ta-da!

My finished mini, "The Braidout," 2015


OK, so I just kind of made this up as I went along, but I actually really like the result!

Our guild hosted a fun and interesting lecture and trunk show with Cloud 9 Fabrics this past winter. Cloud 9 is based right here in New Jersey and produces beautiful organic cottons for quilting and garments, and recently launched a gorgeous line of solids called Cirrus Solids. We decided it would be fun to do a challenge involving making mini quilts with only Cirrus Solids. Everyone got a package of six fat eighths, randomly selected.  I got Limestone, Fuchsia, Grass, Shadow, Sand, and Lagoon in my pack.

I had my fabric pack for about two months with no movement. I was totally without ideas. What to do? I considered and tossed out numerous ideas. Eventually I just started Pinteresting and blog hopping like any good modern sewist, and somehow stumbled on this ribbon quilt border tutorial. Here was a way to use all the colors in an interesting pattern! It was a start.

I set about trying to figure out scale.  I decided I wanted the colors to float in white. At first I tried very tiny strips, but that didn't quite work. (And yes, I muslined my quilt blocks! Old habits die hard.) 


Once I had a good size (and a day or so to readjust my vision to bigger blocks) I set about sewing my real fabric.


Then it was time to quilt! I thought of a number of ideas but settled on narrow straight lines on the background to follow the long blocks.


Within them, I didn't want anything to obscure the fabric, so I (GASP) stitched in the ditch, with invisible thread.  I'd never tried invisible thread before, but the YLI suggested to me at my local LQS was about as dreamy to work with as one could hope for. I did no prep beyond lowering tension a teeninchy bit---no thread stand, used a regular quilting needle---and only had one thread break, at the very beginning.


I initially wanted the binding to be quiet to let the colors of the blocks shine through. But I had some leftover strips and not enough grey to bind, so I just cut them in binding-sized strips and pieced them in. I didn't want them cut off by sewing on the diagonal, so I sewed them straight, figuring it was really no different from one long straight- or cross-grain piece, and also rationalizing that it's not as though this will get a lot of wear and tear.


Then a bit of machine binding and all done!

I wasn't sure I was going in the right direction at any point while working on this, but I think it came out pretty well in the end. 

I decided to call it "The Braidout" because the blocks reminded me of braids. (A braidout, in case you don't know, is a particular way of hairstyling--which I am doing this very minute!--that involves plaiting your wet hair and taking it down when dry.)

Now--to hang vertically or horizontally?


30 June 2015

Super Online Sewing Match II Round 1: A Sparkling Sutton

Here's my version of the Round 1 pattern for the Super Online Sewing Match II:  the Sutton Blouse by True Bias Patterns!


(more photos and details after the jump!)

25 February 2014

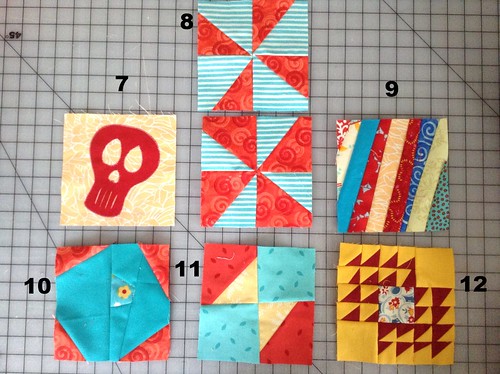
Finish #5: Modern Mondays, Blocks 7-12

Here are my February Modern Mondays Quiltalong blocks!


7.  Skull:  This is a pretty simple machine applique block.  Because some of the curves--particularly on the inside--were so small, I did it as raw edge applique.  I've done raw-edge applique two ways:  with fusible webbing and with freezer paper.  Since this was just one big shape, I used freezer paper that I traced the template onto and then ironed onto the red fabric to create the little skull, and then peeled the paper off and stitched down with a blanket stitch.  I left his little tooth spacing for extra creepiness, but I think I'm gonna want to put some Fray-Check on them. 

8.  Pinwheels:  The directions made two blocks.  Don't look too closely at those points.  I SAID DON'T LOOK TOO CLOSE AT THOSE POINTS.  These still might be my favorites this time, wack points and all (how DO you get those to match up, anyway?)

9.  String block--the hardest part here was trying to get this to come out semi-wonky!  It's really easy to end up with a bunch of straight-sewn seams when you don't want them.

10. Snowball variation:  Meh.  This felt like a lot of work for not much payoff.  Maybe it would look different with a quilt full of them, but I'm not so sure. 

11. Bowtie:  This was fun to put together and I love the colors--but again, I'd like it to have come out less uniform.  Not sure what I did wrong here!

12. Winged Square:  This was a MARATHON of piecing.  I made tiny sort-of-half-square-triangles for EVERY ONE OF THOSE LITTLE WINGS.  A quilt of these would be SO COOL--but I'd kill myself in the process.  I'm pretty sure this block took all of an evening by itself!

22 January 2014

Third Finish: Modern Mondays, Blocks 1-6

My third finished project was these six blocks for the Central Jersey Modern Quilt Guild's 2014 quiltalong, featuring the Modern Mondays blocks from Jenifer Dick's 42 Quilts blog.  Jenifer led the Modern Mondays quiltalong some time ago, but we've picked it up this year as a little project for our group.  I decided to join up because

1) I feel like I almost never participate in anything, despite being an officer.  We've had a lot of fun things:  a couple of retreats, a quilt bee, swaps and challenges, sewcials...and most of the time I have to pass.  I don't even bring things to show most of the time.  Granted, that's because most of what I make is clothing, and this is a quilting group, but sometimes I don't bring the quilts I've made--or I bring them and don't show them (I brought the Birthday Cake quilt when I finished it, but didn't have the nerve to show it till the very end, and then it was too late.  It went on my bed the very next day.)  Plus my workload has been very unpredictable in the last year or so, so I don't like to commit to doing things I'm not sure I can follow through on.  We're co-sponsoring a regional sewcial--the Mid-Atlantic Mod Retreat--in April, and I'm not going because I have a client meeting the next weekend, and am on alert for another client meeting sometime in April. But this is just six small blocks per month, so I figure perhaps I can get these done...?

2) It gives me an opportunity to practice making different kinds of blocks.  Each block is a modernized variation of a traditional quilt block.  I feel like I don't spend nearly enough time familiarizing myself with the nomenclature and history of various blocks (which is so unlike me!)  But this a nice little introduction to different skills without the commitment of a full quilt. Jenifer also offered traditional versions of each block in a Traditional Tuesdays quiltalong--I think I'd like to try that sometime, too.

3) It's a low-pressure way to get another top done.  I tend to want to crank crank crank and by the time I'm about halfway through a top, I'm bored, it's no longer fun and I'm ready to move to the next project.  That's why I have three tops sitting around here right now--one half-quilted, one sandwiched and pinned (A YEAR AGO!!!!!) and sitting, and another folded away waiting to be sandwiched. argh.

So here I am.  On to the blocks! (jump ahead)

02 December 2012

Sewing Confrontations: Pants, Part 2--Muslin Time!


Whenever I try a new pattern, I usually do a mockup (or muslin) of it in some cheap fabric.  It helps me see if the pattern and whatever adjustments I’ve made actually work before I commit to cutting the fabric I’ve actually purchased for wearing.  Last week I wandered into WalMart and found: some pretty hideous and cheap giant pink gingham at $1 a yard.  SCORE!  

Full disclosure:  I actually like gingham, but not so much the 2" gingham for pants.
So with fabric in hand, I commence to dealing with the pattern.  As I mentioned in the first post, I’m using a pattern from a BurdaStyle magazine.  Here it is:

Let's get cutting!
Simple, right?

(lotsa photos after the jump!)

30 November 2012

Sewing Confrontations: Pants, Part 1


confrontation
As I mentioned earlier, my friend Jessica over at Quilty Habit is doing a series this month called Sewing Confrontations, challenging fellow sewers to tackle some lingering challenge.  Being all super ambitious, and thinking I had all the time in the world when I signed up, I decided I would work on making myself a decent-fitting pair of pants.

Any of you who know me in real life know that I don't wear pants all that often.  7 days of 10--probably 9 of 10 in the spring and summer--you'll find me in a dress.  This is not because I don't like pants, or because of any exceptional twee-ness on my part.  It's really because a) dresses are easier to fashion into a proper outfit;  and b) it's much easier to find (or make) dresses that fit decently.

One of the first things you want to do when sewing garments is to anticipate possible problems.  I already know ready to wear pants give me all kinds of fitting issues, due to the following facts:

1) I'm tall, and long-legged.  I wear a 34-inch inseam, which is hard to come by.  Most stores' "long" pants are 32" or 33", which is not-quite-sufficient for me.  Or, (very occasionally) they go the other way entirely and offer 36", which is way too long.
2) My waist is both high and small.  My hips are both wide and long.  Sometimes a pair of pants will fit just about everywhere, and then I sit down and it's like I'm wearing legwarmers only, because they do not really cover anything anymore.  If the rise is high enough that everything's covered, and the pants fit my hips well, my waist is probably swimming. 
3) I have a fairly significant swayback.  For those of you who don't sew clothing-- a swayback is the term people use for that hollow at the small of your back, just above your hips--when it curves inwards dramatically, you've got a swayback.  Do you try on pants or skirts and they seem to fit everywhere except the back waistband is always floating in space inches away from your actual back waist?  You, my friend, are a member of the Swaybacked Sisterhood. 
4) I have full hips and thighs.  Sometimes pants in my size are tighter than they should be up top, but a larger size is so much bigger everywhere that that doesn't help. Usually at that point I just give up and leave without any pants. 

So knowing these things, there are certain lower-body fitting adjustments I am always on the lookout for, even when I am sewing dresses--lengthening the leg and hip, grading the waist in and hips out, and taking in or adjusting the back waist.  In skirts and dresses, these things are relatively simple to do, but how to translate them to pants?  These are the challenges I'm setting out for myself this winter. 

For this week, however, I need to get into the habit of actually constructing pants.  (photos after the jump!)

27 October 2012

Sewing Confrontations

My friend Jessica over at Quilty Habit contacted me a few weeks ago about a new series she's putting together:

The series is called "Sewing Confrontations" and she's asking a number of other bloggy friends this November to man up (or woman up, or trans up, as the case may be) and force ourselves to work on some sewing issue that we have been struggling with or avoiding.  Since my machines have been gathering dust on their shiny avocado-and-lemon-smoke exteriors, I thought this might be a good way to get back into things.  After all, it's football season and it's soon going to be too cold to even run errands.

I thought hard about something I have been neglecting but thought I could realistically accomplish in a month.  I'm not going to successfully free-motion the bed quilt I made for myself last winter by the end of November.  This I know is simply not happening. I've been putting off quilting it at all for a year.  I mean, it took me an hour last night to quilt straight lines on a POTHOLDER.  Yeah.

But you know what is bothering me and I might be motivated to do?  Pants.  Like many women, I struggle mightily to consistently find pants that fit worth a toss.  And once I do seem to find a brand and style I like, THEY CHANGE THEM!  Sometimes the entire style is revamped (so much for the J. Crew Favorite Fits that got me through grad school--were they only my favorite??)  sometimes they decide to get cheap cute with the fabric (*cough*GAPbrands*cough*) and they are no longer worth the money. (jump coming here!)


Template by Suck My Lolly - Background Image by TotallySevere.com