14 August 2015

Maxidress Madness: McCall's 6700


Yes, I know, I'm late as all heck jumping on this bandwagon, but I DON'T CARE.


I stumbled across the pattern for this in a local shop for like a dollar.  I though it looked like a good buy--easy to sew and easy to wear.  I was a little surprised that it required knit rather than woven fabric--the dress on the envelope looks woveny to me--but I have plenty of knits I haven't sewed up so I went on with it. I broke out this pretty print that had been in the stash for a long time and went to work.

It took me longer to put this together than most folks, although I made very few alterations.  Actually, all I did was add to the skirt, grading out at the waist and hip.  The bust point measurement for the size that I usually cut for an FBA actually matched me, so I decided to give it a chance.

The most difficult parts of this were the shoulders.  I somehow don't have a loop turner (how?) and the tubes are so tiny, plus In the jersey they stretched. I gave up out of frustration and just stitched the long ends together and knotted the ends. Next time I'll do them properly.   Also, the shoulders gathered a lot when I attached the elastic, but they flattened out when I attached the straps (which are stitched to the outside shoulder seams). In the end, they were ok.


The bust ended up fitting pretty well--I did find that once I removed the basting that held each section to each other that---well, I need to baste them back together for modesty. 


I was surprised to find that it was actually floor-length on me! I dunno how more petite ladies deal. Also pleasant: the high waist hit at my waist.


I made the sash that comes with the pattern, but after trying it a few times I decided I prefer the dress without it.  Next time I might do a wider sash, or completely go without. 

I wore it to work with a cardigan.  Except for the gaping top issue, it was very comfy! Definitely a Secret Pajamas sew. 


Yay! 


13 August 2015

Cirrus Solids Miniquilt Challenge--Finished!

Ta-da!

My finished mini, "The Braidout," 2015


OK, so I just kind of made this up as I went along, but I actually really like the result!

Our guild hosted a fun and interesting lecture and trunk show with Cloud 9 Fabrics this past winter. Cloud 9 is based right here in New Jersey and produces beautiful organic cottons for quilting and garments, and recently launched a gorgeous line of solids called Cirrus Solids. We decided it would be fun to do a challenge involving making mini quilts with only Cirrus Solids. Everyone got a package of six fat eighths, randomly selected.  I got Limestone, Fuchsia, Grass, Shadow, Sand, and Lagoon in my pack.

I had my fabric pack for about two months with no movement. I was totally without ideas. What to do? I considered and tossed out numerous ideas. Eventually I just started Pinteresting and blog hopping like any good modern sewist, and somehow stumbled on this ribbon quilt border tutorial. Here was a way to use all the colors in an interesting pattern! It was a start.

I set about trying to figure out scale.  I decided I wanted the colors to float in white. At first I tried very tiny strips, but that didn't quite work. (And yes, I muslined my quilt blocks! Old habits die hard.) 


Once I had a good size (and a day or so to readjust my vision to bigger blocks) I set about sewing my real fabric.


Then it was time to quilt! I thought of a number of ideas but settled on narrow straight lines on the background to follow the long blocks.


Within them, I didn't want anything to obscure the fabric, so I (GASP) stitched in the ditch, with invisible thread.  I'd never tried invisible thread before, but the YLI suggested to me at my local LQS was about as dreamy to work with as one could hope for. I did no prep beyond lowering tension a teeninchy bit---no thread stand, used a regular quilting needle---and only had one thread break, at the very beginning.


I initially wanted the binding to be quiet to let the colors of the blocks shine through. But I had some leftover strips and not enough grey to bind, so I just cut them in binding-sized strips and pieced them in. I didn't want them cut off by sewing on the diagonal, so I sewed them straight, figuring it was really no different from one long straight- or cross-grain piece, and also rationalizing that it's not as though this will get a lot of wear and tear.


Then a bit of machine binding and all done!

I wasn't sure I was going in the right direction at any point while working on this, but I think it came out pretty well in the end. 

I decided to call it "The Braidout" because the blocks reminded me of braids. (A braidout, in case you don't know, is a particular way of hairstyling--which I am doing this very minute!--that involves plaiting your wet hair and taking it down when dry.)

Now--to hang vertically or horizontally?


30 June 2015

Super Online Sewing Match II Round 1: A Sparkling Sutton

Here's my version of the Round 1 pattern for the Super Online Sewing Match II:  the Sutton Blouse by True Bias Patterns!


(more photos and details after the jump!)

23 June 2015

Welcome Super Online Sewing Match Readers!

Hi to folks from Sew Mama Sew! I'm Kristina, and I'm a contestant in this year's Super Online Sewing Match.  AW YEAH MAYNE.  (Major props to Kathleen for encouraging me to audition--thanks lady!)


It's me!  Dress is McCall's 6012 (vintage pattern)

I'm a little frightened and a lot excited to begin the competition. I've been sewing clothes and quilts for nearly five years now, but I usually do so pretty privately. When I first began sewing I shared about it here, but lately I really have been keeping things to myself.


Giant Starburst quilt, 2015 (inspired by a mini from Canoe Ridge Creations)

 
This year, though, I participated in Me Made May via Instagram (find me @kehdeebee) and I found it really interesting to post my work and be able to take a good look at the body of it, as well as get feedback from people I don't already know. (I fear my coworkers and friends and family are terribly indulgent towards me.) this, plus the encouragement of a fellow CJMQG member, gave me the courage to try.  

I'm hoping and expecting to learn a lot by participating in this contest, and Who knows--maybe I can help some of you, too!  So read around, hit up the archives, get a baked treat, make yourselves comfy.  I hope we'll be hanging out for a good while this summer ☺️


Lekala 4315 tie-collar dress

Onward and upward!

--Kristina, aka miss kate


09 April 2014

Non-apologies

I hate it when people spend lots of time apologizing for not blogging, so I'm not gonna do it.

Suffice it to say I haven't been doing much domestic activity lately, so there hasn't been much to share.  It's been an unreasonably cold and grey winter here, and, probably in an attempt to bring warm, pleasant, hey-let's-go-out-and-DO-something weather to the region, I've been spending a LOT of time on my athletic hobbies of late.  One--swimming--is going VERY well.  I love my instructor/coach and the venue is very supportive--when I take class it's only other adults in the pool, and we have a great time. I think I am improving by leaps and bounds.  Every week I can tell I am a stronger swimmer than the week before.  I look forward to class and am reluctant to leave, and that's heartening and surprising for a person who decided ten years ago, after struggling for a year to swim competently, that she perhaps simply didn't like water.

The other--skating--well, I WAS making a great deal of progress this year but have had to change locations and instructors, and I'm not really making much progress right now.  The things I need to work on are very difficult to practice at public skating, and I'm still not far along enough to be eligible to skate during Freestyle hours.  I think I am rapidly approaching something of a crossroads with skating now--I've been doing this for several years, and I think I should perhaps be farther along than I am.  I am trying to decide if I should push forward to private coaching, but even finding out any info on how to do that is more difficult than it should be.  Or deciding whether it's worth it.  If I don't want to ultimately start testing*, then it might not be.  But I don't know if I want to test without more consistent instruction and getting over the hump on a few more elements.

It's very hard to get good consistent instruction, especially as an adult skater.  Folks tend to assume you're only on the ice to keep from being completely bored while your kid is in lessons, which is not my situation at all.  It's true that there are a lot of people in the classes for that reason initially, but in my experience the vast majority of those people want to learn, too!  Without a clear path to progress, though--adult classes so often feel like an afterthought, even though there are official curricula just like in the kids' classes--many of them simply fall by the wayside when a session ends or kids start the next season's sport or work gets busy--they don't have much incentive to keep pushing.  end rant.

So that's where I've been--at the skating rink or the pool, most days of the week.  I'm not apologizing for that, though I do worry some (hopefully without cause) that my domestic skills AND my writing skills are deteriorating.  I've only made one thing in the past month--a little near-instant-gratification clothing project that I'll show soon. 

*in order to participate in US Figure Skating Association competitions, you have to pass a battery of tests to demonstrate proficiency.  The tests are divided into levels.  Each level passed makes you eligible to enter certain competitions.  (You can go here for more info.)

25 February 2014

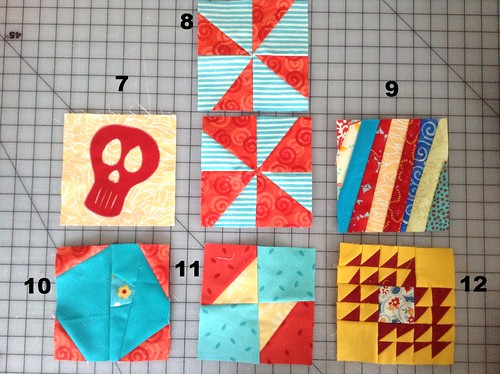
Finish #5: Modern Mondays, Blocks 7-12

Here are my February Modern Mondays Quiltalong blocks!


7.  Skull:  This is a pretty simple machine applique block.  Because some of the curves--particularly on the inside--were so small, I did it as raw edge applique.  I've done raw-edge applique two ways:  with fusible webbing and with freezer paper.  Since this was just one big shape, I used freezer paper that I traced the template onto and then ironed onto the red fabric to create the little skull, and then peeled the paper off and stitched down with a blanket stitch.  I left his little tooth spacing for extra creepiness, but I think I'm gonna want to put some Fray-Check on them. 

8.  Pinwheels:  The directions made two blocks.  Don't look too closely at those points.  I SAID DON'T LOOK TOO CLOSE AT THOSE POINTS.  These still might be my favorites this time, wack points and all (how DO you get those to match up, anyway?)

9.  String block--the hardest part here was trying to get this to come out semi-wonky!  It's really easy to end up with a bunch of straight-sewn seams when you don't want them.

10. Snowball variation:  Meh.  This felt like a lot of work for not much payoff.  Maybe it would look different with a quilt full of them, but I'm not so sure. 

11. Bowtie:  This was fun to put together and I love the colors--but again, I'd like it to have come out less uniform.  Not sure what I did wrong here!

12. Winged Square:  This was a MARATHON of piecing.  I made tiny sort-of-half-square-triangles for EVERY ONE OF THOSE LITTLE WINGS.  A quilt of these would be SO COOL--but I'd kill myself in the process.  I'm pretty sure this block took all of an evening by itself!

15 February 2014

Finish #4: Cake Patterns Pavlova top


My fourth finished project this year was this little wrap top from Cake Patterns' Pavlova Separates. This was a project I'd wanted to do for a long while, but didn't because I wanted to wait until I had a functioning stretch stitch. 

The Pavlova separates consist of this top and a skirt.  For some reason, the skirt pattern is very hard to find online now, but the top is, as of this writing, still sold via Cake's Etsy site.  I'm really drawn to the Cake patterns, not only because of my fondness for making things with sugar, but because the patterns are for knit clothing that actually assumes you have some sort of shape (but don't necessarily want a bandage dress).  They aren't shapeless sacks (which, mind you, have their place...but I don't think that place is on me, for the most part) or super tight "body con" (or whatever the kids are calling it these days) things.  They are clothes you can wear, seriously!  I also like that the sizing for the patterns is generally as thoughtful and thorough as patterns for woven clothing;  so many knit patterns and tutorials are all like "o, it's knit fabric, it don't matter, it'll stretch!!!!"  (yes, but that doesn't mean it will look good!) or my favorite: "pick something that already fits you perfectly and use that to make yourself a pattern!!!!!"  Um, well, if I already had perfectly fitting clothes I wouldn't spend lots of energy and money making them...but I digress.

Anyway, I bought the Tiramisu pattern a long while back, intending to participate in its sewalong (Cake hosts rather elaborate sewalongs for all its patterns, also fun) but got sidetracked.  So I thought I'd try the Pavlova top as a nice little winter-appropriate thing to sew up.

First the pattern itself.  It really only consists of a few pieces:  the body of the top, the sash, and I think some sleeve facings.  However, since it's all one piece, it took a while for me to figure out what size to sew (high bust?  full bust?  waist?  hip?)  as I am different sizes everywhere.  I ended up just going with a 40.

The sash is sized differently--you cut based on your waist measurement, so if you're small-busted but large-waisted, or vice versa, you can make sure you have enough coverage in both areas.

And though the body of the top is only one piece, there was still a good bit of fiddliness:  reinforcing with interfacing here, gathering there, hemming here, here, and here, so I can't say it was very quick to toss together, and the direction weren't always super clear to me in helping me plan for the next thing (for instance, my staystitching on the collar is still visible, and I have no idea what I could have done wrong there.)

The top is also pretty short.  Most reviews I read beforehand said that, so it wasn't a huge surprise (though being high-waisted I thought I might get a bit more length!) but I only feel comfortable wearing this with a higher-waisted skirt with a tank top tucked underneath.  The little "muffin cover" flap on the back is completely negated by my swayback, so it just gets buried under the ties on my actual person.


All in all, I think it's a pretty cute top, and I'll probably try it a few more times.  Next time, though, I'd use a stretchier fabric and definitely one that is reversable--I didn't think about the fact that the ties show both sides and my fabric (a Patty Young interlock--I think this is one of the Mod Blooms variants) only has one side. 

30 January 2014

Nigella Cookalong, January 2014: Mini Pavlovas


For some reason, I decided to start making pavlovas last summer.  I think it's because they appear so frequently in the cookbooks and blogs I read, and I was curious about them.  Also I'd finally located a place to pick berries, so I had tons of them all summer.  They're pretty simple affairs:  meringue shell, whipped cream, fruit--and yet I've never seen them here in the States.  What gives?

Well, probably what gives is why on earth would anyone choose to eat a meringue?  They are basically lumps of sugar, without any of the delicious squicky butteriness of a real cookie.  However, as I discovered during my pavlova-making period this summer, slap some lightly-sweetened whipped cream and good fruit on that bad boy and you've got yourself a darn-near-perfect dessert/snack/lunch/whatever.  I AM OBSESSED.

I haven't done a cookalong in a long while--part of the reason this blog has been so tumbleweedy of late. I haven't seen one that really caught my fancy and I don't really have the time (or the kitchen) that I did when I was doing the original Tuesdays with Dorie.  I'd noticed that there was a monthly cookalong at Nigella.com, but never really paid attention to it till I saw this month's choice was Mini Pavlovas.  I AM THERE.

(more after the jump!)

22 January 2014

Third Finish: Modern Mondays, Blocks 1-6

My third finished project was these six blocks for the Central Jersey Modern Quilt Guild's 2014 quiltalong, featuring the Modern Mondays blocks from Jenifer Dick's 42 Quilts blog.  Jenifer led the Modern Mondays quiltalong some time ago, but we've picked it up this year as a little project for our group.  I decided to join up because

1) I feel like I almost never participate in anything, despite being an officer.  We've had a lot of fun things:  a couple of retreats, a quilt bee, swaps and challenges, sewcials...and most of the time I have to pass.  I don't even bring things to show most of the time.  Granted, that's because most of what I make is clothing, and this is a quilting group, but sometimes I don't bring the quilts I've made--or I bring them and don't show them (I brought the Birthday Cake quilt when I finished it, but didn't have the nerve to show it till the very end, and then it was too late.  It went on my bed the very next day.)  Plus my workload has been very unpredictable in the last year or so, so I don't like to commit to doing things I'm not sure I can follow through on.  We're co-sponsoring a regional sewcial--the Mid-Atlantic Mod Retreat--in April, and I'm not going because I have a client meeting the next weekend, and am on alert for another client meeting sometime in April. But this is just six small blocks per month, so I figure perhaps I can get these done...?

2) It gives me an opportunity to practice making different kinds of blocks.  Each block is a modernized variation of a traditional quilt block.  I feel like I don't spend nearly enough time familiarizing myself with the nomenclature and history of various blocks (which is so unlike me!)  But this a nice little introduction to different skills without the commitment of a full quilt. Jenifer also offered traditional versions of each block in a Traditional Tuesdays quiltalong--I think I'd like to try that sometime, too.

3) It's a low-pressure way to get another top done.  I tend to want to crank crank crank and by the time I'm about halfway through a top, I'm bored, it's no longer fun and I'm ready to move to the next project.  That's why I have three tops sitting around here right now--one half-quilted, one sandwiched and pinned (A YEAR AGO!!!!!) and sitting, and another folded away waiting to be sandwiched. argh.

So here I am.  On to the blocks! (jump ahead)

21 January 2014

Second 2014 finish: Lekala 4149 (The Jailhouse Frock)

My second finished project came hot on the heels of the first!  Heartened by the success of Lekala 4315, I pulled out another long-languishing bolt of interlock knit and sewed together a new dress from another Lekala pattern.  I present to you below what I am calling The Jailhouse Frock: (image after the jump)

20 January 2014

First Finish of 2014: Lekala 4315 (The Cheerios Dress)

After a full week of sitting home reading Edith Wharton novels (I'm kind of bingeing; don't mind me) I decided it was time to get goin' with the sewin' again.

You may recall that back in 2012 I bought myself a little Kenmore 1040 for my birthday.  I originally named said Kenmore "Midge."  She has been renamed, and she is now "Jolene," because really, she ain't no good.  That machine has given me nothing but trouble, and I've yet to have it serviced to my liking.  So I decided to cast about for something else--I still have and love Phyllis, my Kenmore 1217, as my primary machine, but let's face it:  she's a boat anchor.  Way too heavy for me to take to classes and sewcials. And no stretch stitches (though she does a mean zigzag) and limited foot options (due to being a left-homing machine) means she's not quite as versatile as I'd like. 

So I maybe came home one day with a third machine, a Viking 100Q:


Not fancy, but it is my first electronic machine.  It has what I needed (all the basic stitches and a few deco stitches) and is light as a feather. I am not pleased with the cost of Viking feet ($129 for a walking foot?!) , but it came with enough feet to get me going. 

Of course I had to justify this purchase, so I pulled out a roll of knit fabric that had been sitting around forever and ordered a new Lekala pattern. 

If you're not familiar with Lekala Sewing Patterns--they are a little different from other pattern companies.   With most, you order a pattern and cut and adjust to fit.  With Lekala, you choose patterns that interest you, send in your measurements and get by email a pattern pre-adjusted to fit you.  Sounds too good to be true, right?  Especially if you are already fully accustomed to doing all kinds of redrafting and adjusting to get a proper fit. And the pattern catalog is HUGE, and they are super inexpensive, to boot!

I was, honestly, skeptical, so I have several patterns of theirs already that I haven't had the courage to try.  But when I saw the line drawing for 4315, I HAD to try sewing it up. Plus I needed something simple but good-looking to get me back into it.

This also gave me a chance to try out the stretch/overlock stitch on the Viking!  So I sent in my measurements, plus a little more info about my figure, and had the pattern within a few hours. Details after the jump!

18 January 2014

Surfacing again--finish #4: BurdaStyle 02/2011 #101

*blows dust off blog*

Boy.  I'm kind of surprised Blogger hasn't revoked my blog-owning privileges.  It has, indeed, been a very long time.  Being crazy, insane, absurd busy (I'm really starting to hate that word) at work meant no energy for cooking or sewing.  After the last post, I only completed one other sewing project in 2013 (though I made a few more):  a dress I made for a tea party in September.  Check it:


The dress is a very simple one from a BurdaStyle magazine pattern.  The bodice has cap sleeves and is lined with cotton batiste, and the skirt is just your basic gathered rectangle skirt.   I'd made the bodice lining way back in the summer of 2012 and never got around to finishing the dress.  So when I found myself needing something for a tea party, I figured why not finish this?  Since I'd made the lining I'd already tweaked the fit.

I only got to wear the dress once, due to it being late September and getting too chilly right after.  So I didn't get to test it too much, though it did withstand hours of eating and tea-drinking and chatting quite well.


If I ever make this again, however, I think I'd like to move the zipper from the side to the center back.  Side zippers are a pain. in. the. butt for the large-busted.  Every time I am afraid I'm gonna get stuck in that thing.  And why have a center back seam if you're not gonna put a zipper in it?

But I've already finished a few things for 2014!  Those will be next :-)

17 May 2013

Send One Your Love--Finish #3

Another week, another finish!  This week's quilt was a little 18"x18" miniquilt, a challenge for the May meeting of the Central Jersey Modern Quilt Guild, of which I am the treasurer!  Earlier this spring, we had a color theory workshop led by our president, Jessica Levitt.


So, in accordance with our new info, we were to create and swap a miniquilt of 24" or less, with an "analogous complement" color scheme:  three colors next to each other on the color wheel and one opposite. I had a bear of a time selecting, but after a morning of playing around with the color wheel here I settled on yellow-green, green, and blue-green with red as my complement.

Now I had colors--what to do?  I had this song title floating around in my head. I'm not sure why.  It's by no means my favorite Stevie Wonder song, but still, something about it lingers with me all the time.  So I decided to start there, and the rest came to me the next morning, literally as I woke up.

First, the phrase.  I considered paper piecing letters, but didn't think it would give me the look I wanted--I wanted very consistent and clear lettering that would stand out.  I wanted to applique.  I found this website for making letter templates, printed the words, figured out where they would go


and then I traced and cut the letters from fabric, using freezer paper to make iron-on templates!

tracing on freezer paper
ironing onto fabric

cutting out letters from fabric with freezer paper templates attached


arranging letters!

I glued them on and zigzagged them down.

Then I made a big heart by using the ticker-tape method from Sunday Morning Quilts--a look I LOVE but would take FOREVER to do quilt-sized--on a rectangle of solid cream fabric, and I cut a heart out and appliqued it on.


I liked it.  It was just what I had in my head!  But I was afraid it was too spartan.

So while I looked at it, I cut out three more hearts from my ticker-taped rectangle.  Then just for the heck of it, I threw them on, along with another square as a stamp.  I expected I would hate the extra stuff.

But I didn't!  EGADS.

So then a week of polling random friends and colleagues ensued.  No one hated the second version, while some objected to the first, and I had my fears about the first for reasons I'm about to get into.  So I decided to go with it, while I mourned the demise of the first. 

Why was I nervous?  Though I liked the blank space it meant that was more space that needed to be quilted thoughtfully and neatly.  Sigh.  I am not a good quilter at all, but I decided to take my chance and quilt connected spirals.

Then I added hangers and bound in light green.  I appliqued more hearts on the back as a label:


I think it came out well in the end.  My first completely self-designed quilt!  I hope my swap partner liked it.


28 April 2013

Another Finish: And-it's-not-even-my-birthday-Birthday Cake


Next in the "out of my head and onto my bed" category:  a take on Elizabeth Hartman's "Birthday Cake" from her Oh, Fransson! blog.  The original was done in blue and grey.  I decided to go for birthday-cake-appropriate pinks and browns:

Ta da!


This quilt finish has been a looooong time coming, worked on in fits and turns here and there over nearly three years.  I started cutting fabric for it at Christmastime in 2010, during Snowpocalypse 2.


From there began the slow process of piecing blocks.  Piles of them.  The original pattern is for a small quilt, but I decided I wanted it bed-sized, so I doubled it.  And spent a lot of time cursing myself for doing so.  At least I finally figured out chain piecing!


Then I took the blocks to work to lay them out (confounding some of my co-workers in the process, no doubt) and then I pieced them together.


I found a nice backing at the Crate and Barrel outlet near me, where bolts of Marimekko are frequently on super sale.  I wanted something quiet for the back since the front was going to be so riotous.  I picked a pretty pink ombre and pieced it together to have the darkest strip in the middle.


Then back to work on a Saturday to sandwich, again surprising co-workers.  I don't like sandwiching on carpet, I found. 

Then...it sat.  and sat and sat.  I didn't know what to do for quilting, and I don't have a machine that makes quilting very fun or easy.  quilting is SCARY.

First I tried a lattice pattern.  That was tiresome to the max!  I tried to mark lines with painters tape and it was tedious, tedious, tedious. 

After a long while, I ripped the diagonals out and decided to just go with roughly straight, roughly parallel lines to mimic the linear patterns, but with no regular spacing and no drawing to break things up a little.  (And to keep my stress levels down.)

My machine is left-needle (you can see it here) which makes finding feet difficult.  I had to find an open-toe walking foot to get one to work at all! (and no, I don't quilt in the dark.)
It took me several months.  Wrestling with a bed quilt under a machine is no joke, even with a sturdy machine and a cabinet to rest some of the weight on.  The bulk and weight of the quilt makes regular stitches hard to accomplish.

But I did finish, after many many nights of football, and decide to bind with a nice lime green--as it turned out, a number of the fabrics I'd used had lime green accents.  I tried machine binding for speed.  It was...ok but I had to go back and redo several places.


I even made a little label!


I embroidered it (don't look too close at those stitches!) and everything.  Then I sewed it on by hand.  I decided that rather than whipstitching I'd do a running stitch in pink.  I still might do a whipstitch to keep those corners firmly down, but for now I'm ok. 


Yippee!  Now I can take my down comforter to the cleaners...


Template by Suck My Lolly - Background Image by TotallySevere.com