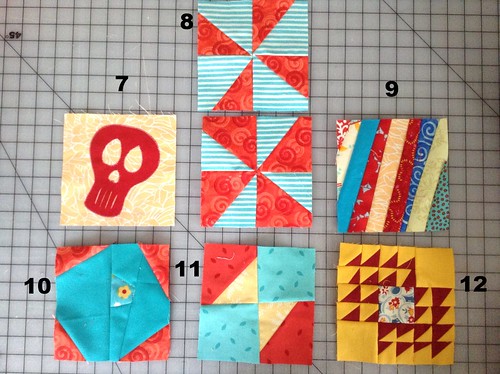
Here are my February Modern Mondays Quiltalong blocks!
7. Skull: This is a pretty simple machine applique block. Because some of the curves--particularly on the inside--were so small, I did it as raw edge applique. I've done raw-edge applique two ways: with fusible webbing and with freezer paper. Since this was just one big shape, I used freezer paper that I traced the template onto and then ironed onto the red fabric to create the little skull, and then peeled the paper off and stitched down with a blanket stitch. I left his little tooth spacing for extra creepiness, but I think I'm gonna want to put some Fray-Check on them.
8. Pinwheels: The directions made two blocks. Don't look too closely at those points. I SAID DON'T LOOK TOO CLOSE AT THOSE POINTS. These still might be my favorites this time, wack points and all (how DO you get those to match up, anyway?)
9. String block--the hardest part here was trying to get this to come out semi-wonky! It's really easy to end up with a bunch of straight-sewn seams when you don't want them.
10. Snowball variation: Meh. This felt like a lot of work for not much payoff. Maybe it would look different with a quilt full of them, but I'm not so sure.
11. Bowtie: This was fun to put together and I love the colors--but again, I'd like it to have come out less uniform. Not sure what I did wrong here!
12. Winged Square: This was a MARATHON of piecing. I made tiny sort-of-half-square-triangles for EVERY ONE OF THOSE LITTLE WINGS. A quilt of these would be SO COOL--but I'd kill myself in the process. I'm pretty sure this block took all of an evening by itself!
25 February 2014
15 February 2014
Finish #4: Cake Patterns Pavlova top
My fourth finished project this year was this little wrap top from Cake Patterns' Pavlova Separates. This was a project I'd wanted to do for a long while, but didn't because I wanted to wait until I had a functioning stretch stitch.
The Pavlova separates consist of this top and a skirt. For some reason, the skirt pattern is very hard to find online now, but the top is, as of this writing, still sold via Cake's Etsy site. I'm really drawn to the Cake patterns, not only because of my fondness for making things with sugar, but because the patterns are for knit clothing that actually assumes you have some sort of shape (but don't necessarily want a bandage dress). They aren't shapeless sacks (which, mind you, have their place...but I don't think that place is on me, for the most part) or super tight "body con" (or whatever the kids are calling it these days) things. They are clothes you can wear, seriously! I also like that the sizing for the patterns is generally as thoughtful and thorough as patterns for woven clothing; so many knit patterns and tutorials are all like "o, it's knit fabric, it don't matter, it'll stretch!!!!" (yes, but that doesn't mean it will look good!) or my favorite: "pick something that already fits you perfectly and use that to make yourself a pattern!!!!!" Um, well, if I already had perfectly fitting clothes I wouldn't spend lots of energy and money making them...but I digress.
Anyway, I bought the Tiramisu pattern a long while back, intending to participate in its sewalong (Cake hosts rather elaborate sewalongs for all its patterns, also fun) but got sidetracked. So I thought I'd try the Pavlova top as a nice little winter-appropriate thing to sew up.
First the pattern itself. It really only consists of a few pieces: the body of the top, the sash, and I think some sleeve facings. However, since it's all one piece, it took a while for me to figure out what size to sew (high bust? full bust? waist? hip?) as I am different sizes everywhere. I ended up just going with a 40.
The sash is sized differently--you cut based on your waist measurement, so if you're small-busted but large-waisted, or vice versa, you can make sure you have enough coverage in both areas.
And though the body of the top is only one piece, there was still a good bit of fiddliness: reinforcing with interfacing here, gathering there, hemming here, here, and here, so I can't say it was very quick to toss together, and the direction weren't always super clear to me in helping me plan for the next thing (for instance, my staystitching on the collar is still visible, and I have no idea what I could have done wrong there.)
The top is also pretty short. Most reviews I read beforehand said that, so it wasn't a huge surprise (though being high-waisted I thought I might get a bit more length!) but I only feel comfortable wearing this with a higher-waisted skirt with a tank top tucked underneath. The little "muffin cover" flap on the back is completely negated by my swayback, so it just gets buried under the ties on my actual person.
All in all, I think it's a pretty cute top, and I'll probably try it a few more times. Next time, though, I'd use a stretchier fabric and definitely one that is reversable--I didn't think about the fact that the ties show both sides and my fabric (a Patty Young interlock--I think this is one of the Mod Blooms variants) only has one side.
Subscribe to:
Comments (Atom)

.JPG)


